How To Use GearBubble For Email List Building With Free Aweber ?

GearBubble is an awesome Print On Demand dropshipping business platform for you to create unique products to sell.
With Print On Demand, it is similar with regular product dropshipping business where you don’t need to keep inventory upfront.
But, Print On Demand also known as POD in short gives you the benefits of creating your unique products to set you apart from your competitors.
On top of that, POD dropshipping business model has much faster shipping time compared to regular product dropshipping.
With GearBubble, you don’t even need to have your own online store such as Shopify to start selling Print On Demand products.
You can simply leverage on the GearBubble platform itself to make sales and profits for your business.
The best part is you’re not only able to make money without having your own store, GearBubble also allow you to use its platform for email list building from your POD customers.
Ability to build email list is the best benefit you can get with GearBubble. You’re not going to find this benefit with other Print On Demand platforms.
With the email list you’ve built, you can then run email marketing.
Why email marketing is important? It allows you to inform your existing GearBubble customers on your latest Print On Demand products, deals and promos.
Therefore, it is going to be your most valuable asset in your business.
Since now you know the benefits of email marketing, you definitely don’t want to miss out the good chance to build email list.
In the remaining of this blog post, I am going to show you how to use GearBubble for your email list building with Aweber free email marketing tool.
Step-By-Step To Use GearBubble For Email List Building With Free Aweber
1) First of all, go here to register for your free Aweber account. After registration, remember to activate your account immediately so you can integrate with GearBubble in later step.

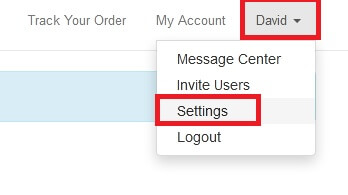
2) Now login to your GearBubble account. Next, click on your name at the top right corner and then “Settings” from the drop-down menu that appears.
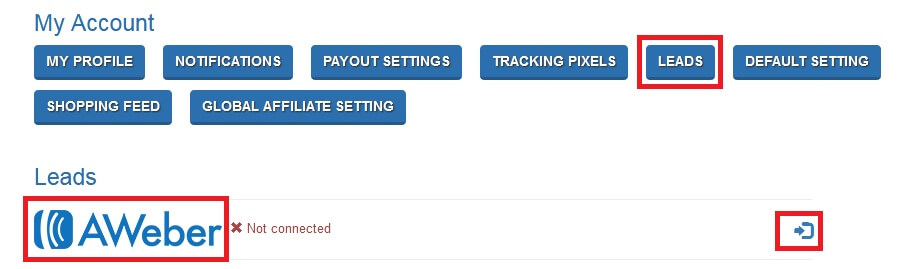
3) Click on “LEADS” button under “My Account”. Then, click on the small icon at the right side of Aweber.
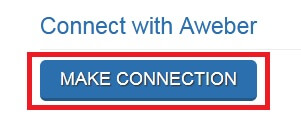
4) Now click on the “MAKE CONNECTION” button under “Connect with Aweber” that appears.
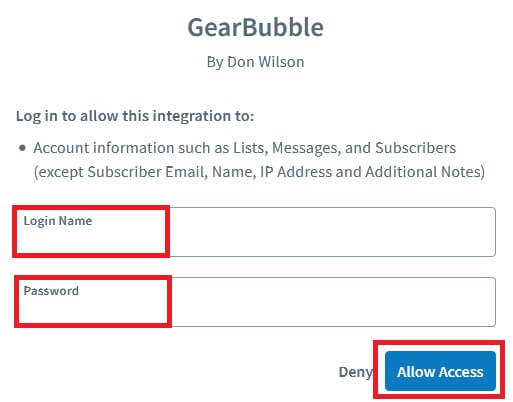
5) Enter the “Login Name” and “Password” for your Aweber account. This is to give permission for GearBubble to integrate with your free Aweber email marketing tool.
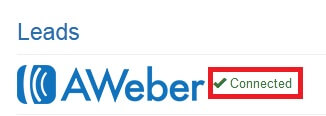
6) When the integration is successful, you’ll see “Connected” status for “Aweber” under “Leads” in your GearBubble account settings.
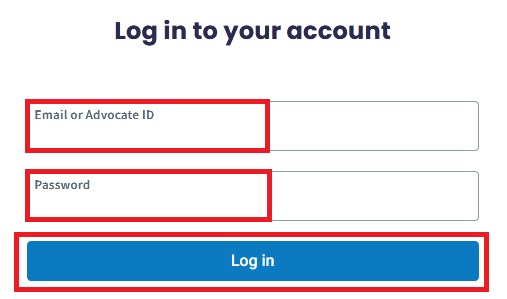
7) Now go to your free Aweber email tool account site and login using your “Email Address” and “Password”.
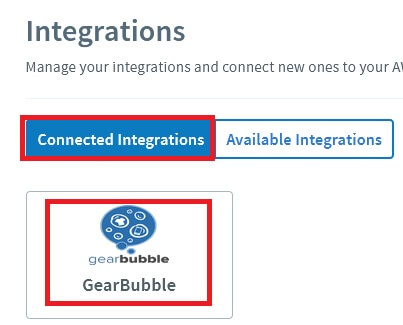
8) After login, click on “Integrations” at the top menu bar.
![]()
9) Click on “Connected Integrations” tab and you should see “GearBubble” there. This means your Aweber account is good to go for email list building with GearBubble.
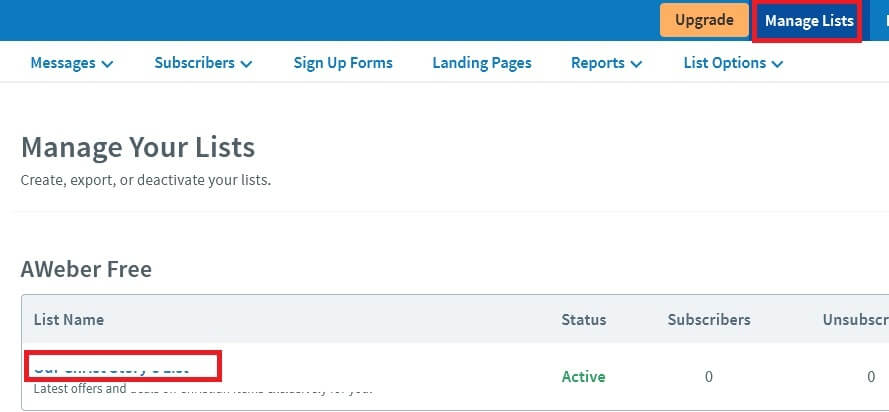
10) Now click on “Manage Lists” at the top menu bar and then click on the list shown under “List Name”.
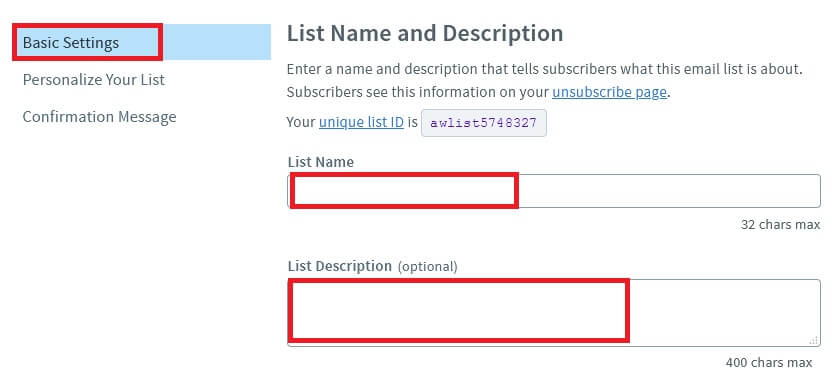
11) Go to “Basic Settings” tab. For “List Name”, enter the your GearBubble store name and for “Description”, enter the about your store. This helps your email subscribers inside your list to aware how come they are in your database.
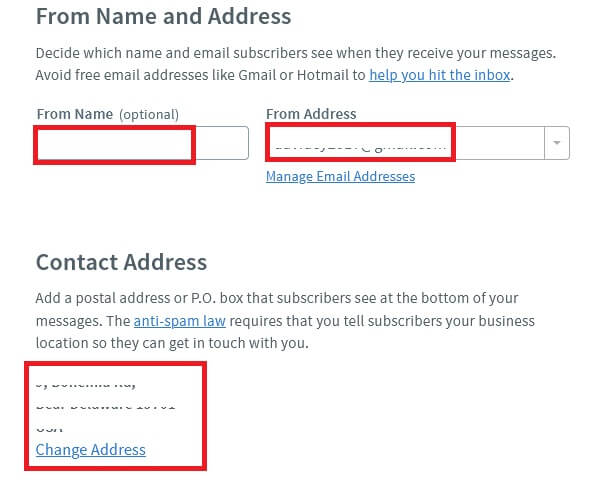
12) Enter your store name for the “From Name” field and your store email address for the “From Address”. This info are going to appear inside the inbox of your email list subscribers every time they receive email from you.
Also you must enter your physical business/home address for “Contact Address” as this is compulsory for email marketing law compliance.
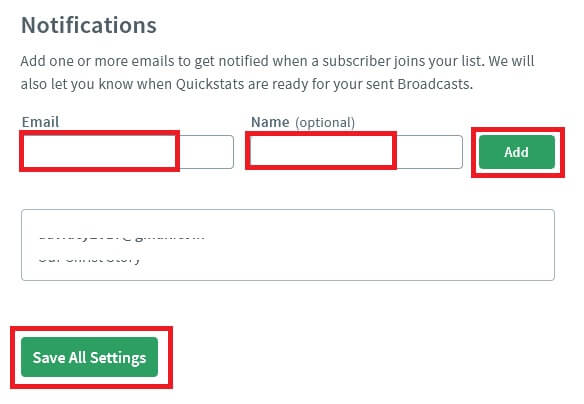
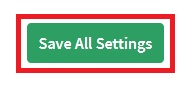
13) Under “Notification”, you can add “Name” and “Email Address” that you want to get the alert whenever there are new subscribers join your email database list. Then, click “Save All Settings” at the bottom of the page.
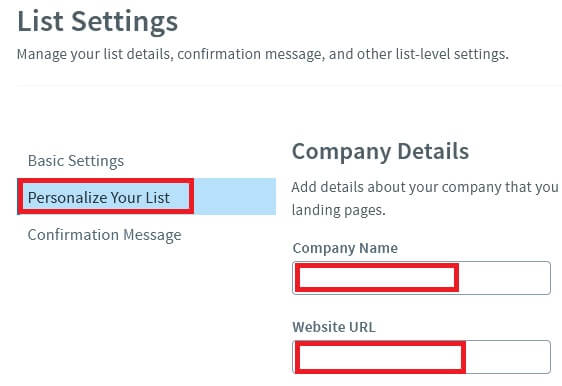
14) Now click on “Personalize Your List” under “List Settings”.
For “Company Name” field, you can either enter the name of your company if you have one, else just put your store name in GearBubble.
For “Website URL”, enter your GearBubble store link.
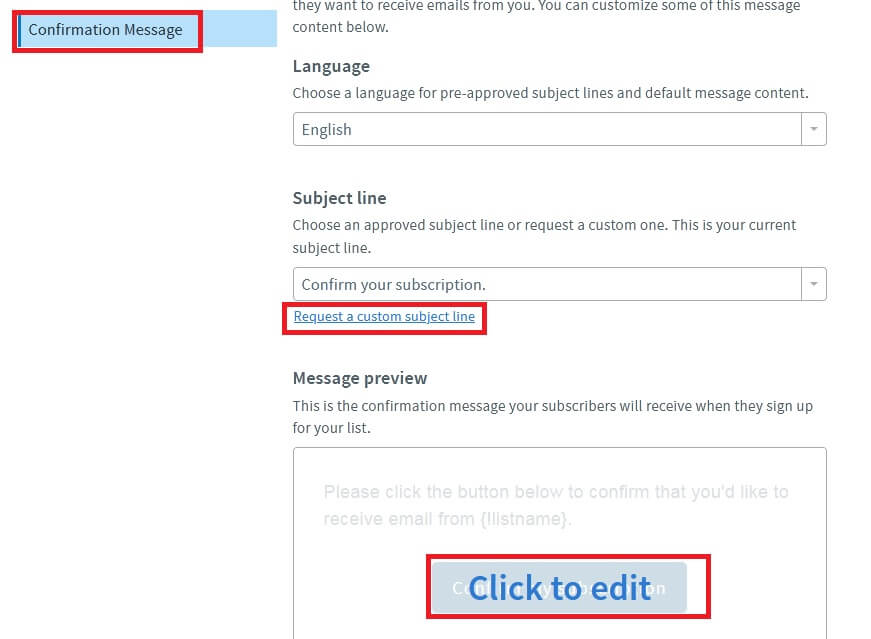
15) You can now proceed to “Confirmation Message” under “List Settings”. Do note that this is a message that will be sent to your new customers in GearBubble automatically by Aweber for them to confirm if they want to be included in your email list. If your customers do not confirm to this “Confirmation Message”, they are not going to be part of your email list.
Therefore, you may want to make some edit on the default “Confirmation Message” so your GearBubble customers are more likely to open it and give their confirmation.
For the “Subject Line”, you can click “Request a custom subject line” and type in a more specified one. An example would be, “Please Confirm Your Subscription To (Your GearBubble Store Name)”.
For the “Message preview”, “Click to edit” and make the first line of your email list building confirmation message to be more attractive. An example would be “Please click the button below to confirm that you’d like to receive future special promotions and deals from (Your GearBubble Store Name)”.
16) After done, click “Save All Settings” button.
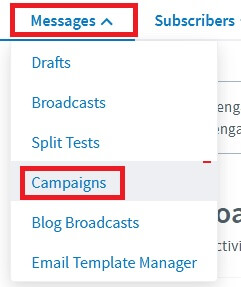
17) Now click on “Messages” at the top menu bar and then “Campaigns” from the drop-down list that appears.
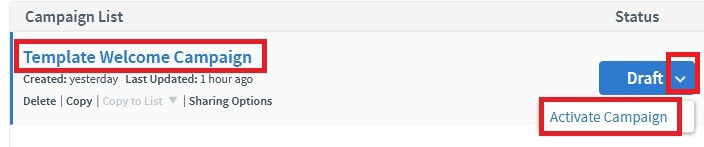
18) You should see the “Template Welcome Campaign” under “Campaign List”. Click on the “down arrow” besides “Draft” and then click “Activate Campaign”. After that, click on “Template Welcome Campaign”.
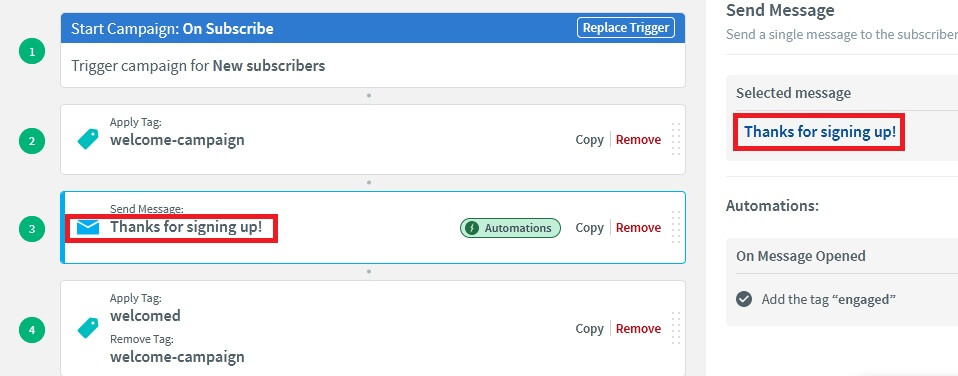
19) First, click on “Thanks for signing up!” under “Send Message” on the left side. Then click on “Thanks for signing up!” under “Selected Message” that appears on right side.
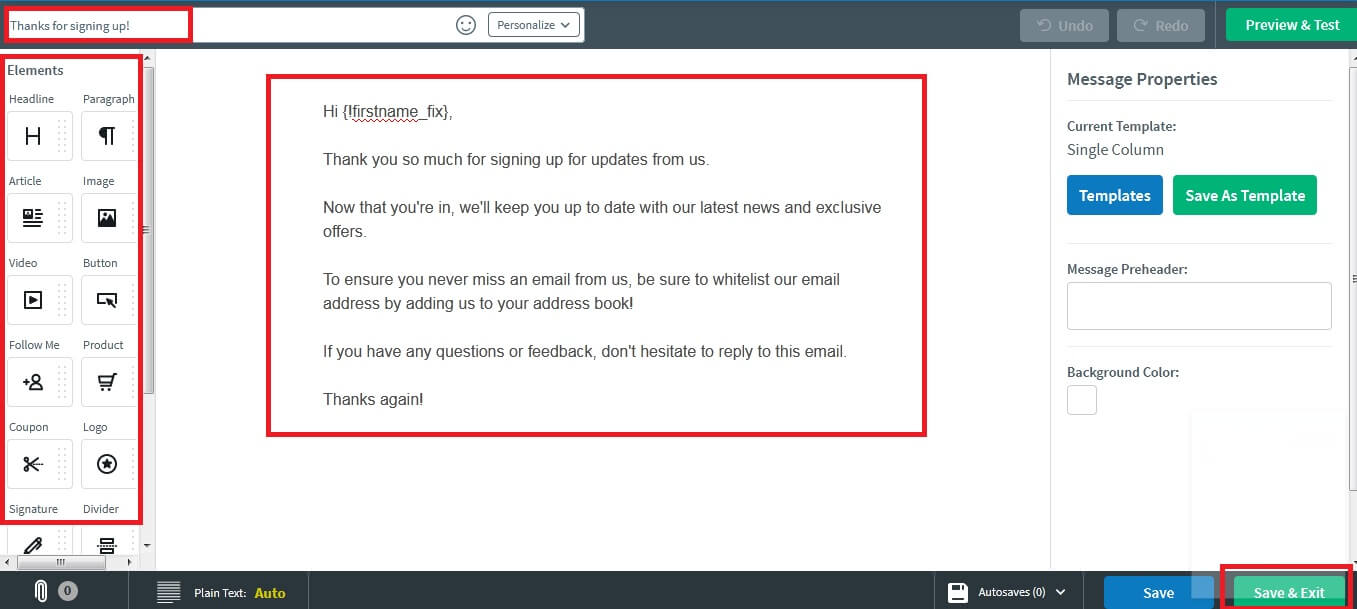
20) Inside the Aweber email editor, you can customize the title and contents of your first email campaign.
On the left side of the email editor, there are also many extra useful “Elements” you can use in your email contents.
After you’re satisfied with your email campaign title and contents, click “Save & Exit” button at the bottom right.
This email will be sending out automatically and immediately each time there is new GearBubble customer of yours who have confirmed to your “Confirmation Message”.
21) You’re now done with the setup on your free Aweber account and it is ready for email list building using GearBubble.
However, there are still a few steps more inside your GearBubble account you need to do so they are working as intended.
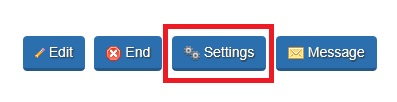
Go to each of your active campaign inside GearBubble which you’re running and click on “Settings” button.
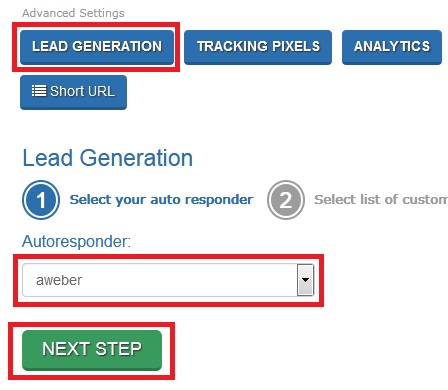
22) Click on “LEAD GENERATION” under “Advanced Settings”, then choose “aweber” under “Autoresponder” and then click “NEXT STEP”.
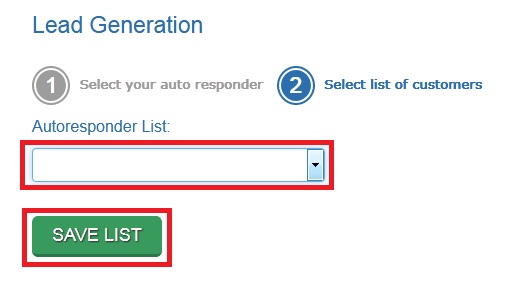
23) Finally, you’re now at the very last step.
Choose the “Autoresponder List” based on the “List Name” which you’ve setup in previous step 11 for your free Aweber email marketing tool and then click “SAVE LIST” button.
Congratulations!!! You’ve now successfully setting up both your GearBubble and Aweber accounts.
They’re now working to your advantage for you to build email database which is your most valuable asset in Print On Demand business.
For your GearBubble customers who are subscribed to your email list, you can send email newsletter using Aweber to them whenever you have special deals or offers. This is going to increase the ROI for your business.