How To Create 300 DPI Image Using Canva?
Image is a very important element to have when comes to online business.
It is required in every side of the business such as in your social media channels, website and advertisements.
So there is a need to create image from time to time and you can’t escape from this fact.
Moreover, if your image is for Merch by Amazon or Kindle Direct Publishing (KDP) paperback, you’ll need to have 300 DPI image.
Having a high resolution image is very important in printing process to produce high quality print work.
Low resolution would cause the print work to appear blurry and pixelated.
This explains which both Merch by Amazon and Kindle Direct Publishing (KDP) only accept image with at least 300 DPI resolution.
Unless you want to outsource your image creation process to freelancer each time, it would be handy if you know how to create one yourself.
Canva is possibly the easiest graphic design software you can use without feeling overwhelmed.
Unlike Photoshop or other complicated softwares, Canva has a simple interface. So it’s easy to master within very short period of time even for a new beginner.
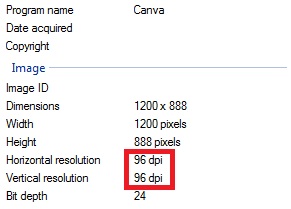
However, Canva is having a drawback. It can only produce a 96 DPI image for JPG and PNG formats. There is no way you can adjust the DPI within the tool.
But after reading remaining of this blog post, you can easily eliminate this drawback.
Because now I am going to show you a simple hack on how to do this.
Simple Hack To Create 300 DPI Image Using Canva
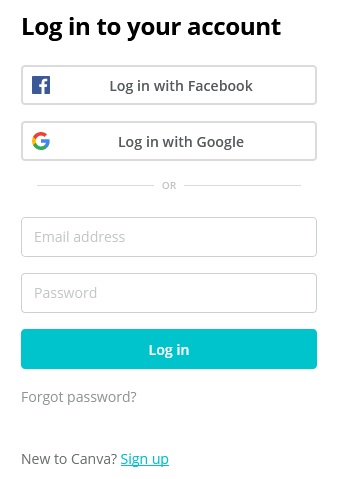
1) Login to your Canva account if you’re already having one (Else you can create one for free).
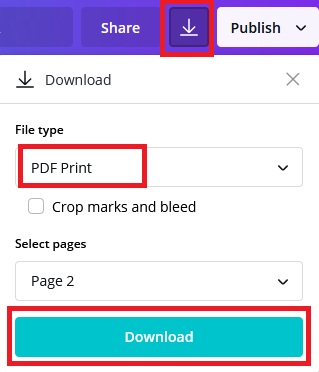
2) Create your image. Then “Download” it by choosing the file type as “PDF Print”.
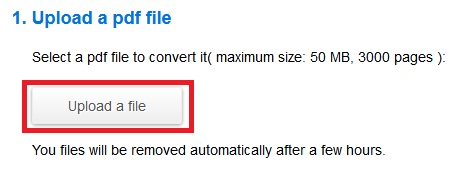
3) Go to PDFtoJPG website. Upload the file in “PDF Print” format you have downloaded from Canva.
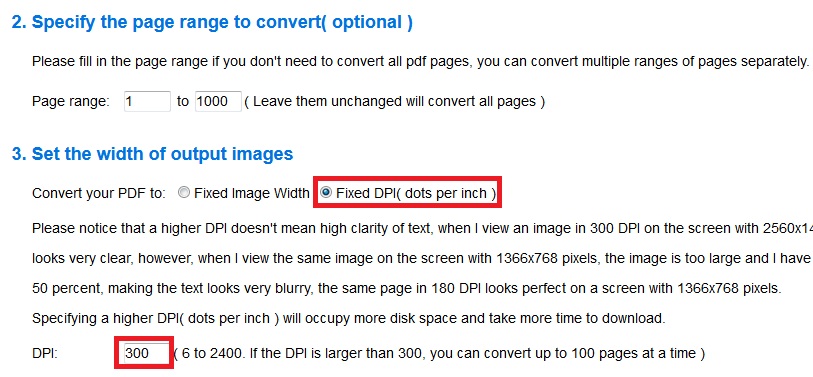
4) For item 2, you can leave the value as default. For item 3, choose “Fixed DPI (dots per inch)” option for “Convert your PDF to:” and enter value “300” for “DPI:”.
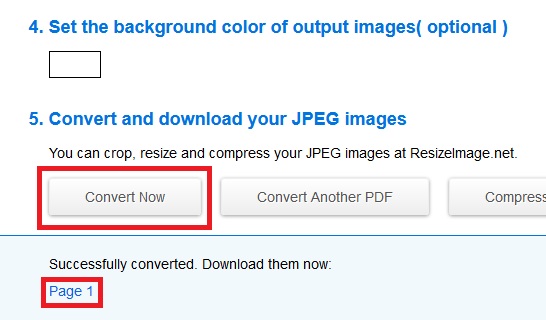
5) Don’t change anything for item 4. In item 5, click “Convert Now” button and then “Download” your new file after it has successfully converted.
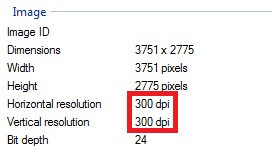
6) You are now having a 300 DPI image in JPG format.
Thank you!! This is so useful! I can now design my own adverts on canvas for print.
Thanks for your comment. Glad that it can help you 🙂
Thank you! This is just what I was looking for!
Welcome. Glad that you have found what you’re looking for 🙂
I like the helpful info you provide in your articles.
I will bookmark your blog and check again here frequently.
I’m quite certain I will learn many new stuff right here!
Best of luck for the next!
Thank you for your support 🙂
This is awesome!! Thank you so much for this!!!!
Thank you for your comment 🙂
Thank you for writing this. Have a great day!
Thanks for leaving your comment. Appreciate that. Hope you have a great day too 🙂
I tried your steps but my attempt says “Failed to convert. Gateway Timeout” Any suggestions?
Probably the server is down at that moment or internet connection problem. Maybe try again later or use more stable internet.
Hi David, any idea why I keep getting Gateway failed? I’ve tried a number of times over a series of days :/ help please!
Hi Steph. Sometimes can be the site server problem or your web browser issue. Maybe you can try with different web browser.
Thank you David! Really appreciate it. I love Canva but I’ve had to outsource this type of work for Print Ads before. Saved me some money going forward. Thanks!
Great that you found value from the post, Jeff. Also, thanks for your feedback 🙂
Thank you!! This was exactly what I needed and it worked like a charm.
Good to hear that. Thanks for your feedback 🙂
I’m getting an error message “Failed to convert.7”
Any idea how to fix this?
Sorry, Keith. I have never encountered this error message. Maybe you can try with other image files you have or use another different web browser.
Ok it works.. but if i want to 300 dpi transparent background png?
How can i creat it?
You would need Canva Pro or use additional graphic software like GIMP to make it transparent.
Thank You !
Welcome
Hi. This is great! I need a pdf file for print books though. How do you recommend getting to that? Another conversion?
Thanks!
Hi Sarah. In your case, you just need to use step 2 to generate the PDF Print in Canva and you don’t need to do the conversion on step.
this is great! I need to submit my banner to the print shop in a PDF file. If I convert the jpeg back to a pdf now will it hold onto the 300 dpi?
Hi Caitlin, Yes, if you use graphic software that allow you to set as 300 DPI first before converting to PDF.
I love when I google something and find a post like yours. Thanks so much for the step-by-step tutorial.
Hi Patricia, thanks for your comments. Hope it helps you 🙂
hey there, thank you for the information! I have a question I’d love for you to help me with if you can- once i convert my pdf file from canva to 300dpi jpg, if i were to take that image and resize and copy that same image multiple times( in different sizes that i need) will the quality of each picture lessen? Or do i need to do download the picture and convert the picture from scratch each time for each new size? hope this makes sense as i’d appreciate some advice, thank you!
Hi Joanna, you will not lessen the picture quality if you resize the 300dpi image to smaller size using graphic software that support 300 dpi but will lose the quality if you resize to bigger size. For copy the same image multiple times has no effect to the picture quality.
Thank you for this. I was able to use the converter.
Welcome. Glad it is useful for you.
This has been so helpful and informative! Thank you so much!
You’re welcome. Glad it helps you. Thanks for commenting!